Spring boot REST microservice tutorial
In this tutorial, we will develop a RESTful microservice using spring boot.
Step 1 : Create a spring starter project
Refer below pom.xml file
<?xml version="1.0" encoding="UTF-8"?>
<project xmlns="http://maven.apache.org/POM/4.0.0"
	xmlns:xsi="http://www.w3.org/2001/XMLSchema-instance"
	xsi:schemaLocation="http://maven.apache.org/POM/4.0.0 https://maven.apache.org/xsd/maven-4.0.0.xsd">
	<modelVersion>4.0.0</modelVersion>
	<parent>
		<groupId>org.springframework.boot</groupId>
		<artifactId>spring-boot-starter-parent</artifactId>
		<version>2.6.6</version>
		<relativePath /> <!-- lookup parent from repository -->
	</parent>
	<groupId>com.javatrainingschool</groupId>
	<artifactId>spring-boot-app</artifactId>
	<version>0.0.1-SNAPSHOT</version>
	<name>spring-boot-app</name>
	<description>Demo project for Spring Boot</description>
	<properties>
		<java.version>1.8</java.version>
	</properties>
	<dependencies>
		<dependency>
			<groupId>org.springframework.boot</groupId>
			<artifactId>spring-boot-starter-web</artifactId>
		</dependency>

		<dependency>
			<groupId>org.springframework.boot</groupId>
			<artifactId>spring-boot-starter-data-jpa</artifactId>
		</dependency>
		<dependency>
			<groupId>com.h2database</groupId>
			<artifactId>h2</artifactId>
		</dependency>

		<dependency>
			<groupId>org.springframework.boot</groupId>
			<artifactId>spring-boot-starter-test</artifactId>
			<scope>test</scope>
		</dependency>
	</dependencies>

	<build>
		<plugins>
			<plugin>
				<groupId>org.springframework.boot</groupId>
				<artifactId>spring-boot-maven-plugin</artifactId>
			</plugin>
		</plugins>
	</build>

</project>
Step 2 : Set up application.properties file
We will use in-memory h2 database for this example. Use below settings in application.properties file
server.port=8081

spring.application.name= Simple Spring Boot App

spring.datasource.driver-class-name=org.h2.Driver
spring.datasource.url=jdbc:h2:mem:bootapp;DB_CLOSE_DELAY=-1
spring.datasource.username=sa
spring.datasource.password=sa

spring.jpa.defer-datasource-initialization=true
spring.jpa.show-sql=true

spring.h2.console.enabled=true
Step 3 : Create entity class Drink.java
package com.javatrainingschool.entity;

import javax.persistence.Entity;
import javax.persistence.GeneratedValue;
import javax.persistence.GenerationType;
import javax.persistence.Id;
import javax.persistence.Table;

@Entity
@Table(name = "Drink")
public class Drink {

	@Id
	@GeneratedValue(strategy = GenerationType.AUTO)
	private int id;

	private String name;
	private String type;
	private boolean alcoholic;

	public Drink() {
		super();
		// TODO Auto-generated constructor stub
	}

	public Drink(int id, String name, String type, boolean alcoholic) {
		super();
		this.id = id;
		this.name = name;
		this.type = type;
		this.alcoholic = alcoholic;
	}

	public int getId() {
		return id;
	}

	public void setId(int id) {
		this.id = id;
	}

	public String getName() {
		return name;
	}

	public void setName(String name) {
		this.name = name;
	}

	public String getType() {
		return type;
	}

	public void setType(String type) {
		this.type = type;
	}

	public boolean isAlcoholic() {
		return alcoholic;
	}

	public void setAlcoholic(boolean alcoholic) {
		this.alcoholic = alcoholic;
	}

	@Override
	public String toString() {
		return "Drink [id=" + id + ", name=" + name + ", type=" + type + ", alcoholic=" + alcoholic + "]";
	}

}
Step 4 : Create repository interface
package com.javatrainingschool.repository;

import java.util.List;

import org.springframework.data.repository.CrudRepository;

import com.javatrainingschool.entity.Drink;

public interface DrinkRepository extends CrudRepository<Drink, Integer>{

	List<Drink> findByName(String name);

}
Step 5 : Create Rest Controller class DrinkController.java
package com.javatrainingschool.controller;

import java.util.List;

import org.springframework.beans.factory.annotation.Autowired;
import org.springframework.http.HttpStatus;
import org.springframework.web.bind.annotation.DeleteMapping;
import org.springframework.web.bind.annotation.GetMapping;
import org.springframework.web.bind.annotation.PathVariable;
import org.springframework.web.bind.annotation.PostMapping;
import org.springframework.web.bind.annotation.PutMapping;
import org.springframework.web.bind.annotation.RequestBody;
import org.springframework.web.bind.annotation.RequestMapping;
import org.springframework.web.bind.annotation.ResponseStatus;
import org.springframework.web.bind.annotation.RestController;

import com.javatrainingschool.entity.Drink;
import com.javatrainingschool.repository.DrinkRepository;

@RestController
@RequestMapping("/api/drink")
public class DrinkController {


    @Autowired
    private DrinkRepository drinkRepo;

    @GetMapping
    public Iterable<Drink> findAll() {
        return drinkRepo.findAll();
    }

    @GetMapping("/name/{drinkName}")
    public List<Drink> findByName(@PathVariable String drinkName) {
        return drinkRepo.findByName(drinkName);
    }

    @GetMapping("/{id}")
    public Drink findOne(@PathVariable Integer id) {
        return drinkRepo.findById(id);
    }

    @PostMapping("/create")
    @ResponseStatus(HttpStatus.CREATED)
    public Drink create(@RequestBody Drink drink) {
        return drinkRepo.save(drink);
    }

    @DeleteMapping("delete/{id}")
    public void delete(@PathVariable Integer id) {
        drinkRepo.findById(id);
        drinkRepo.deleteById(id);
    }

    @PutMapping("update/{id}")
    public Drink updateDrink(@RequestBody Drink drink, @PathVariable Integer id) {
        drinkRepo.findById(id);
        return drinkRepo.save(drink);
    }

}
Step 6 : Run and test the microsrevice
Since this is a microservice, we need to have a REST client to test it. Postman is one such client which we will use in this tutorial. Postman is a tool which is used to test RESTful web/microservices.
If you do not have Postman already installed on your machine, click here to install it.
After Postman is installed. Open it and hit below urls.
Create Drink Request
Json request/response for Create Drink end point. Please note that this will be a post request.
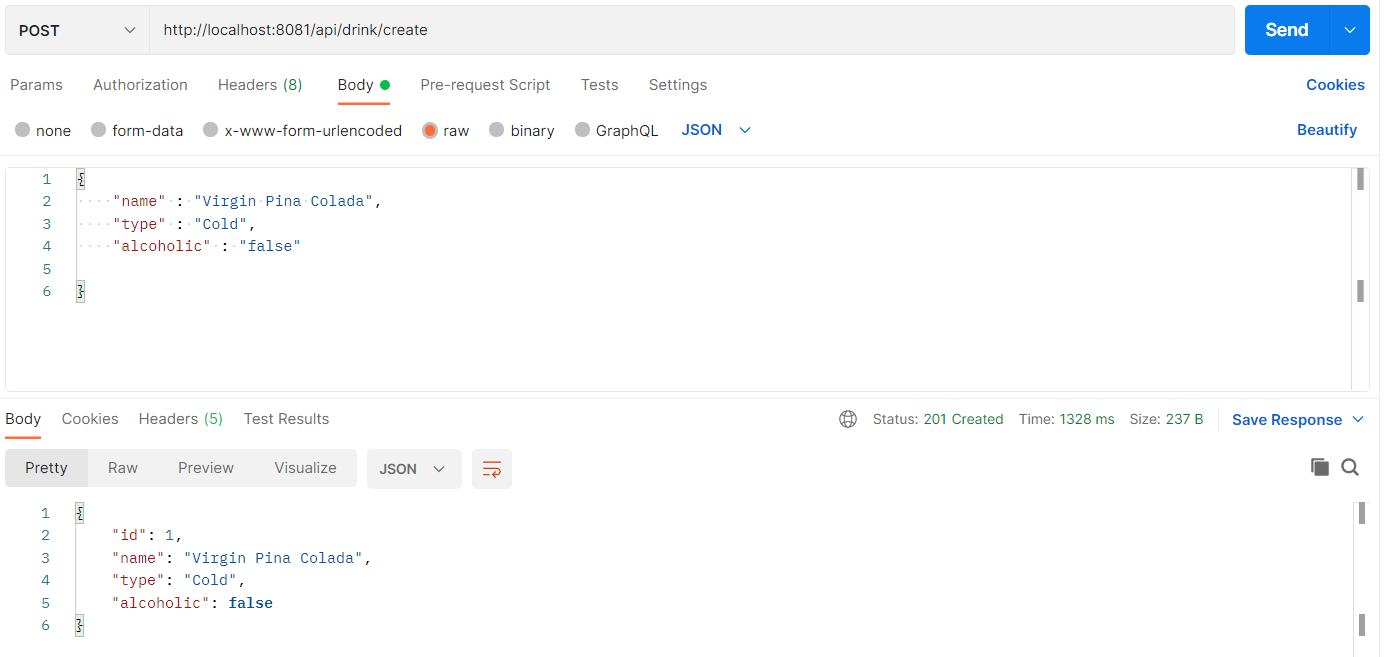
Similary, you can create more drinks with different values.
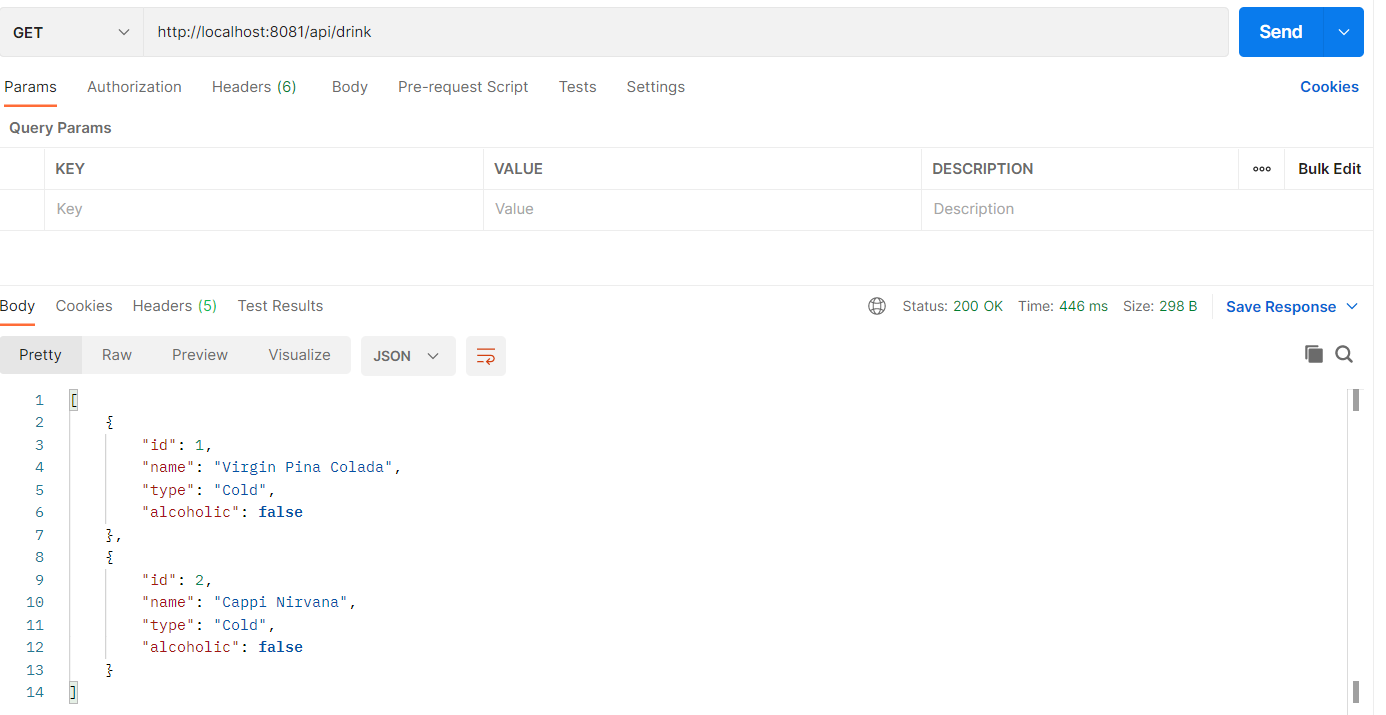
Get all drinks request
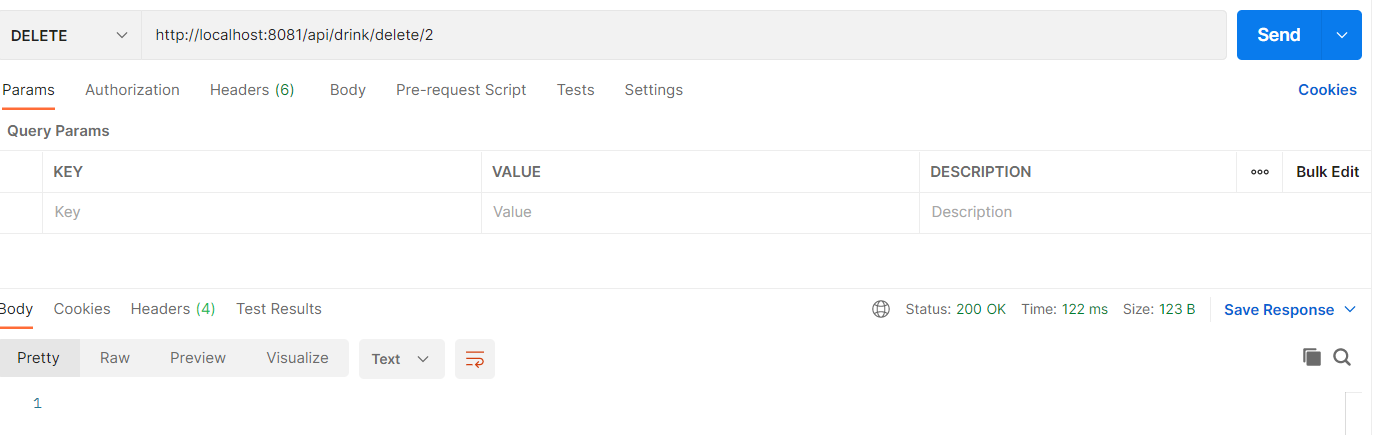
Delete a drink request
Simlilary, a drink can be deleted.
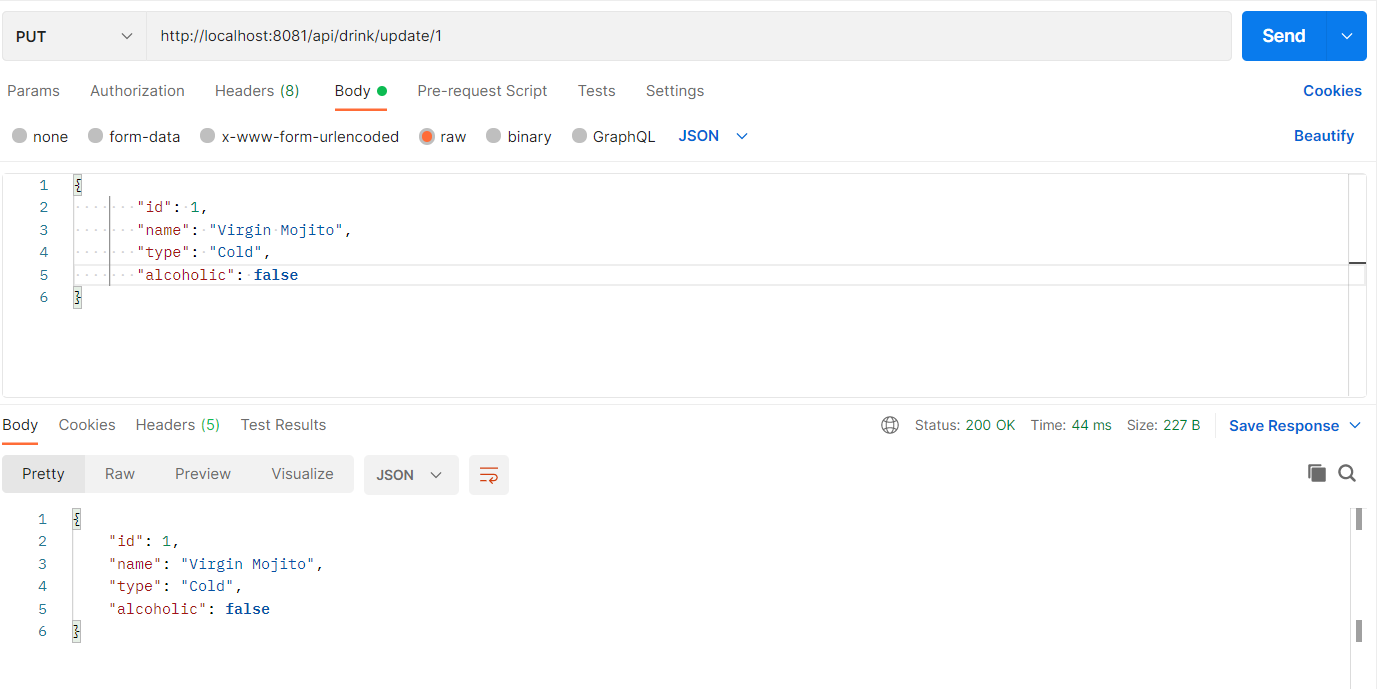
Update drink request
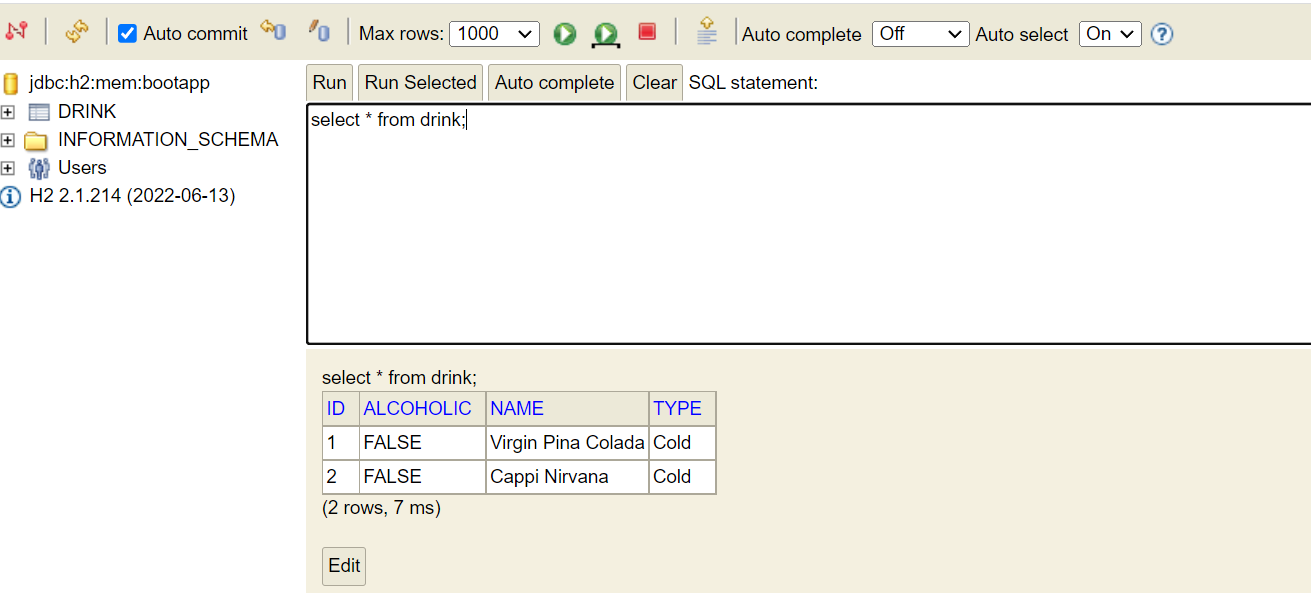
Enable h2 console
Database h2 can also be accessed to verify the records. For that, you need enable h2-console.
Add below property to enable h2-console.
spring.h2.console.enabled=trueHit the below url to access h2-console. port will be the one on which your microservice is running
http://localhost:8081/h2-console