OAuth2 security with Springboot
OAuth 2.0 is an authorization framework which allows a third-party application (client) to access a user’s resources on another service (resource server) securely, without sharing the user’s credentials, by using tokens issued by an authorization server.
Let’s decode this using an example. Let assume you want to use an application called ‘ABC’ which needs registration first for authenticaiton purpose. Obviously, while registering it will need your details like name, surname, email, DOB, country, nationality etc. However, it is slightly long process, and you are not interested in registering. So, you choose the another way that the application provides – “Login using Facebook or Google”. So, once you click using any of them, you just need to login to Facebook or Google and you are allowed access to the application ‘ABC’. This is facilitated using OAuth2.0 framework. Various components play different roles in this framework. Let’s understand them one by one.
Resource Owner
The end user who want to gain access. In the above example, it is you who wants to access application ‘ABC’.
Client
The application ‘ABC’ is the client application here.
What is Authorization Server?
Authorization server acts as a centralized server component that is used to authenticate users’ identity and issue access tokens upon successful authentication. In order to access any microservice, first, authorization server needs to be requested to get a JWT token. And with a valid token, the microservice can be accessed. In the above example, Google’s accounts.google.com OAuth endpoints acts as authorization server.
What is Resource Server?
Resource server accepts access token issued by the Authorization server and provides this token to the clients which want to access protected resources. In this example, Google’s APIs (userinfo, Gmail, Calendar, etc.) act as resource server.
What is JWT token?
JWT Token is a JSON Web Token. It is used to represent the claims secured between two parties.

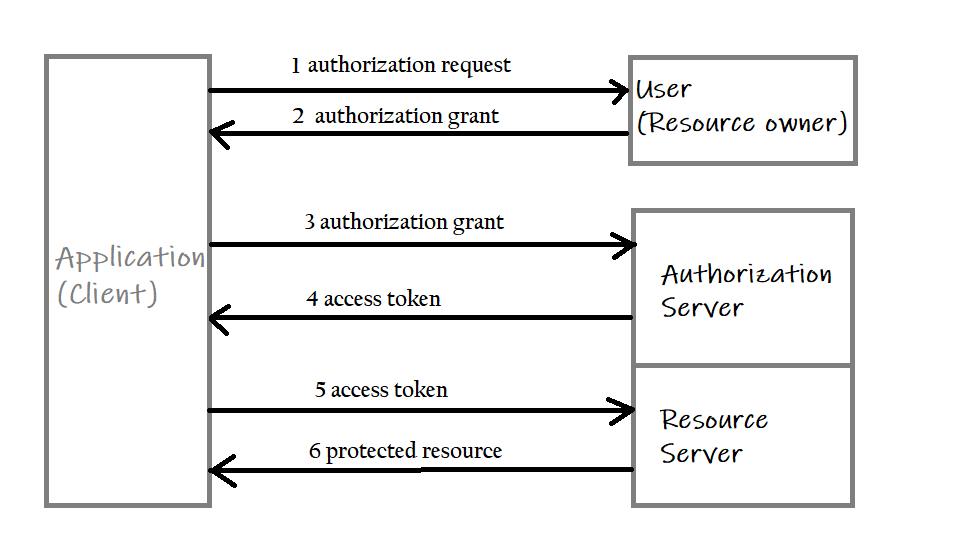
OAuth2 Workflow
Implementation of OAuth2.0
Step 1. Build a springboot project with below dependencies

pom.xml
<?xml version="1.0" encoding="UTF-8"?>
<project xmlns="http://maven.apache.org/POM/4.0.0" xmlns:xsi="http://www.w3.org/2001/XMLSchema-instance"
	xsi:schemaLocation="http://maven.apache.org/POM/4.0.0 https://maven.apache.org/xsd/maven-4.0.0.xsd">
	<modelVersion>4.0.0</modelVersion>
	<parent>
		<groupId>org.springframework.boot</groupId>
		<artifactId>spring-boot-starter-parent</artifactId>
		<version>3.5.6</version>
		<relativePath/> <!-- lookup parent from repository -->
	</parent>
	<groupId>com.sks</groupId>
	<artifactId>boot-oauth2-example</artifactId>
	<version>0.0.1-SNAPSHOT</version>
	<name>boot-oauth2-example</name>
	<description>Demo project for Spring Boot</description>


	<properties>
		<java.version>17</java.version>
	</properties>

	<dependencies>
		<dependency>
			<groupId>org.springframework.boot</groupId>
			<artifactId>spring-boot-starter-oauth2-client</artifactId>
		</dependency>
		<dependency>
			<groupId>org.springframework.boot</groupId>
			<artifactId>spring-boot-starter-security</artifactId>
		</dependency>
		<dependency>
			<groupId>org.springframework.boot</groupId>
			<artifactId>spring-boot-starter-thymeleaf</artifactId>
		</dependency>
		<dependency>
			<groupId>org.springframework.boot</groupId>
			<artifactId>spring-boot-starter-web</artifactId>
		</dependency>
		<dependency>
			<groupId>org.thymeleaf.extras</groupId>
			<artifactId>thymeleaf-extras-springsecurity6</artifactId>
		</dependency>


		<dependency>
			<groupId>org.springframework.boot</groupId>
			<artifactId>spring-boot-starter-test</artifactId>
			<scope>test</scope>
		</dependency>
		<dependency>
			<groupId>org.springframework.security</groupId>
			<artifactId>spring-security-test</artifactId>
			<scope>test</scope>
		</dependency>
	</dependencies>

	<build>
		<plugins>

			<plugin>
				<groupId>org.springframework.boot</groupId>
				<artifactId>spring-boot-maven-plugin</artifactId>

			</plugin>
		</plugins>
	</build>

</project>
Step 2. – Set up application.properties file
In the above properties file, you need to replace <your-client-id> and <your-client-secret> with actual values. If you don’t have, create using this link
spring.application.name=boot-oauth2-example

spring.security.oauth2.client.registration.google.client-id=<your-client-id>
spring.security.oauth2.client.registration.google.client-secret=<your-client-secret>
spring.security.oauth2.client.registration.google.scope=profile,email
spring.security.oauth2.client.registration.google.redirect-uri={baseUrl}/login/oauth2/code/{registrationId}
spring.security.oauth2.client.registration.google.authorization-grant-type=authorization_code
spring.security.oauth2.client.registration.google.client-name=Google

spring.security.oauth2.client.provider.google.authorization-uri=https://accounts.google.com/o/oauth2/v2/auth
spring.security.oauth2.client.provider.google.token-uri=https://oauth2.googleapis.com/token
spring.security.oauth2.client.provider.google.user-info-uri=https://www.googleapis.com/oauth2/v3/userinfo
spring.security.oauth2.client.provider.google.user-name-attribute=sub

server.port=8080
Step 3. Create Security Config class
package com.sks;

import org.springframework.context.annotation.Bean;
import org.springframework.context.annotation.Configuration;
import org.springframework.security.config.annotation.web.builders.HttpSecurity;
import org.springframework.security.web.SecurityFilterChain;

@Configuration
public class SecurityConfig {

    @Bean
    public SecurityFilterChain securityFilterChain(HttpSecurity http) throws Exception {
        http
            .authorizeHttpRequests(auth -> auth
                .requestMatchers("/", "/login**").permitAll()
                .anyRequest().authenticated()
            )
            .oauth2Login(oauth2 -> oauth2
                .defaultSuccessUrl("/dashboard", true)       // redirect after successful login
            );

        return http.build();
    }
}
Step 4. Create UserController class
package com.sks;

import org.springframework.security.oauth2.client.authentication.OAuth2AuthenticationToken;
import org.springframework.web.bind.annotation.GetMapping;
import org.springframework.web.bind.annotation.RequestMapping;
import org.springframework.web.bind.annotation.RestController;

import java.util.Map;

@RestController
@RequestMapping("/api/user")
public class UserController {

    @GetMapping("/info")
    public Map<String, Object> getUserInfo(OAuth2AuthenticationToken authToken) {
        return authToken.getPrincipal().getAttributes();
    }
}
Step 5. Create DashboardController class
package com.sks;

import org.springframework.security.core.annotation.AuthenticationPrincipal;
import org.springframework.security.oauth2.core.user.OAuth2User;
import org.springframework.stereotype.Controller;
import org.springframework.ui.Model;
import org.springframework.web.bind.annotation.GetMapping;

@Controller
public class DashboardController {

    @GetMapping("/dashboard")
    public String getDashboard(@AuthenticationPrincipal OAuth2User principal, Model model) {
        // Extract user details
        String username = principal.getAttribute("name");
        String email = principal.getAttribute("email");

        model.addAttribute("username", username);
        model.addAttribute("email", email);

        return "dashboard";
    }
}
Step 6. Create html files index.html, dashboard.html

index.html
<!DOCTYPE html>
<html xmlns:th="https://www.thymeleaf.org/">
<head>
    <meta charset="UTF-8">
    <title>Home</title>
    <style>
        body {
            background-color: rgb(231, 209, 245);/* Light purple background */
            font-family: Arial, sans-serif;
            color: black;
        }
        h1 {
            color: black;
        }
        a {
            color: rgb(0, 0, 255); /* Dark blue for links */
            text-decoration: none;
            padding: 10px;
            border: 2px solid rgb(0, 0, 255);
            border-radius: 5px;
            display: inline-block;
            margin-top: 20px;
        }
        a:hover {
            background-color: rgb(255, 128, 128)
        }
    </style>
</head>
<body>
    <h1>Spring Boot OAuth2 Example</h1>
    <!-- Link for OAuth2 login with Google -->
    <p><a th:href="@{/oauth2/authorization/google}">Login with Google</a></p>
</body>
</html>
dashboard.html
<!DOCTYPE html>
<html xmlns:th="https://www.thymeleaf.org/">
<head>
    <meta charset="UTF-8">
    <title>Dashboard</title>
    <style>
        body {
            background-color: rgb(231, 209, 245); /* Light purple background */
            font-family: Arial, sans-serif;
            color: black;
        }
        h1 {
            color: black;
        }
        p {
            margin: 20px 0;
        }
    </style>
</head>
<body>
    <h1>Welcome to the Dashboard</h1>
    <!-- Display user's details -->
    <p>Username: <span th:text="${username}"></span></p>
    <p>Email: <span th:text="${email}"></span></p>
</body>
</html>
Step 7. Run and test the application
Hit the url http://localhost:8080

It will redirect to login to google

Once you login successfully, you will be redirected to the below page

Okay! That’s enough mental gymnastics. Let’s enjoy a cup of coffee.
